 WhatsApp
 Facebook
 YouTube
FT2/FT4/FT8
The pages of the FT8, FT4 and FT2 decoders are opened from the Digital Modes menu and have the same layout: the duration of the reception cycle changes (15 seconds in FT8, 7.5 seconds in FT4, 3.75 seconds in FT2) and the title shown on the page.
The radio itself decodes the messages it receives and lists them on the screen. To do this it must be tuned to a frequency where it transmits in these ways and must have the time synchronized: we will see how this is done later, in the W and M buttons.
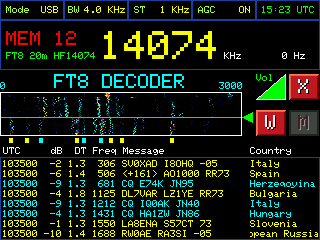
FT8 decoder page
Below is the description of the various components. The images show the FT8 decoder: FT4 and FT2 are the same, except for the title.
Header
At the top are the same five boxes as the main page: Mode, BW, ST, AGC and the clock. They serve as a reference: in the example the radio is USB, with a 3.0 kHz band and 1 kHz step.
Frequency display and OPEN MAP button
Below the heading is the frequency the radio is tuned to, in large letters. On the left, in place of the VFO/MEM indication on the main page, there is the green OPEN MAP button, which opens the locator map with the decoded stations (we describe it in the FTx Locator Map chapter). Even touching the Mode and BW boxes, at the top left, opens the same map.
Spectrum and Waterfall
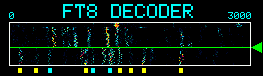
Below the frequency is the waterfall: it shows the received audio from 0 to 3000 Hz, with the time flowing from top to bottom. FT8 signals appear as colored vertical stripes.
Small colored boxes appear under the waterfall: one for each decoded message, placed at the station's audio frequency and of the same color as the message in the list.
The little triangle to the right of the waterfall is the synchronization indicator: it is red as long as the radio waits for the start of the next cycle to begin decoding.
List of messages
At the bottom left is the list of decoded messages, one per line, with these fields:
- UTC — the time of the cycle when the message was received (hours, minutes, seconds).
- dB — the level of signal to noise (signal-to-noise ratio).
- DT — the delay in seconds between the signal and the start of the cycle.
- Freq — the audio frequency of the signal, in Hz.
- Message — the text of the message, for example "CQ TA1MB KN41".
- Country — the country of the station. If the message contains the location, the distance in kilometers and the direction in degrees also appear after the country. If the name is longer than the available space, it scrolls by itself.
The color of the message indicates what type it is: cyan for a CQ (a calling station), yellow for other messages, green for the end of a connection (73, RR73 or RRR).
When you change decoder (for example from FT8 to FT4) a separation line appears in green in the list with the name of the new decoder written: it serves to distinguish messages received in one way from those received in the other.
Decoder title
To the right of the list, in blue, is the title FT8 DECODER (or FT4 DECODER, or FT2 DECODER): it indicates which decoder is active. When you scroll the list of messages becomes yellow with the word SCROLL, as we will see later.
W and M buttons
Below the title are the two time synchronization buttons. W is synchronization via WiFi: when the radio is connected to a WiFi network and has taken the time, the button is red (as in the example). M is manual synchronization: when the radio is connected to WiFi it is disabled and appears grey. Their operation is described later.
Volume
At the bottom right is the volume icon, with the words Vol.
X button
The red X, at the bottom right, closes the decoder and takes you back to the Digital Modes menu.
Synchronize the time
To decode, the radio needs to know when each cycle begins, so it needs the exact time. There are two ways to give it to him.
With WiFi: if a network is already saved on the radio, tap the W button. If there are no saved networks, or there is no connection, the words "Press W for WIFI synchronization / Press M for Manual synchronization / Tap here to search for a WIFI network" will appear in the waterfall area: by touching that area the radio searches for available WiFi networks to connect to one of them.
By hand: tap the M button. In the waterfall area, "Tap here to synchronize" appears on a green background: tap it at the instant a cycle starts, i.e. when the reference clock shows the seconds :00, :15, :30 or :45 (for FT8). "Waiting for synchronization" appears and the radio begins counting cycles from that moment.
Change frequency
By turning the knob the frequency changes, in steps equal to the value of ST if you are in VFO, or by passing from one memory to another if you are in MEM.
By touching the frequency digits, if you are in VFO the numeric keypad opens to directly type the frequency; if you are in MEM the list of memories opens instead, to choose one.
Scroll through the message list
By touching the list of messages the title turns yellow with the writing SCROLL: by turning the knob you scroll through the received messages, forwards and backwards. To return to normal view, tap anywhere outside the list: the title turns blue and the list restarts from the last message received.
Adjust the volume
Tap the volume icon: it turns yellow. Rotating the knob raises or lowers the volume. Tapping anywhere outside the icon makes the volume deselected again.