 WhatsApp
 Facebook
 YouTube
FTx Map Locator
The locator map shows on a world map, in real time, where the stations that the FT8, FT4 and FT2 decoders are decoding are coming from: each message containing a Maidenhead locator causes a dot to appear at the corresponding point, and the radio calculates the distance and direction from your QTH. It is opened from the OPEN MAP button on the decoders (see chapter FT2, FT4 and FT8), and decoding continues to work while the map is open. In the decoder from which you opened it, the X at the top right takes you back.
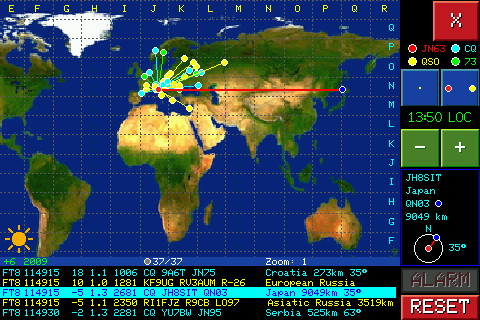
Locator map, in LOG view with a station selected
Below is the description of the various components visible on the page. The map has two display modes: LIVE, in which it follows incoming messages, and LOG, in which it freezes and allows you to choose a station; we describe them later.
Map
It's the large area on the left: a satellite map of the world, with the Maidenhead locator grid above it (dotted lines). The yellow letters at the top and the blue ones on the right side indicate the fields of the grid (from A to R): they are used to read the locator of a point.
The map can obscure the side of the Earth where it is night, to let you see at a glance the border between day and night: it is the band that radio amateurs call grey line, where the longest connections often open. It is turned on and off by tapping the icon at the bottom left of the map: it shows a sun when blackout is off, a moon when it is on.
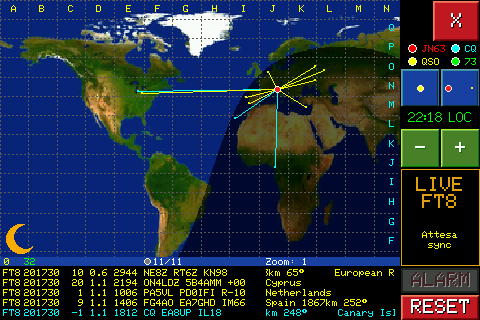
Example of a summer solstice map
Your QTH dot
The red dot with the white border is your position, calculated from the locator set on the QTH Locator page. Until you have set a locator the radio cannot draw either your dot or the stations.
Station dots
Each decoded station is a dot, in the center of its locator's square. The color depends on the last message received from that station: cyan for a CQ, yellow for an ongoing QSO, green for 73 (end of contact). From your dot a line of the same color starts towards each station. Only the messages still present in the list appear on the map (the radio keeps 260 of them, in common between FT8, FT4 and FT2).
X button
The red X, at the top right, closes the map and takes you back to the decoder from which you opened it (FT8, FT4 or FT2).
Legend
Under the
Dot and line buttons
Below the legend there are two blue buttons. The first, with a dot, alternates the dots of the stations between large (circle with white border) and small (a small square), useful when there are many stations. The second, with the red dot, a dash and a yellow dot, shows or hides the lines starting from your QTH. The icon for each button shows what you'll get when you tap it. The two choices are saved: the radio remembers them even after switching off.
Clock
Below the two buttons is the clock, with the indication UTC or LOC. As in the other pages, touching it switches from UTC time to local time and vice versa.
Zoom on the map
The two green buttons − and + reduce and increase the zoom, in steps of one level: the levels go from 0 (full map) to 9. − is gray at level 0, + is gray at the maximum level. The current level is written at the bottom in the blue band ("Zoom: 3").
Tap a point on the map: the map zooms in one level centered on that point. By retouching the map, the camera moves to the touched point without changing level: to change level use − and +. Each press of the knob reduces the zoom by one level; when you are already at level 0, the pressure switches from LIVE to LOG and vice versa. To center the map on your QTH tap the legend.
In LOG, touching the dot of a station selects it: the list of messages and the data box are updated on that station and the map centers the frame on it. If the map was at level 0, switch to the first zoom level; if it was already enlarged, it keeps the current level and only moves the center.
LIVE panel / station data
The box below the + and − buttons changes with the mode. In LIVE it shows the word LIVE with the decoder mode (FT8, FT4 or FT2) and a small spectrum of the received audio, to see at a glance if a signal is arriving; before the decoder has synchronized, "Waiting for sync" appears. In LOG it shows the data of the selected station: name, country, locator (with a blue dot if it is drawn on the map), distance in kilometers, and underneath a compass with the direction in degrees towards the station (the red dot in the center is you, the blue is the station, the N at the top is north).
ALARM and RESET
At the bottom right there are two red buttons. ALARM is gray and currently has no function. RESET deletes all messages and resets the map: it is gray if there is no message yet, otherwise it asks for confirmation with "Delete all messages?" and the YES and NO buttons. Deleted messages also disappear from the decoder list.
Counter band
At the bottom of the map there is a blue band with some numbers, which appear at the first message. On the left, "+N" in green (or "0" in yellow) is the number of messages decoded in the last cycle; next to it is the total number of messages received since you turned on the radio or pressed RESET. Then, after a gray dot, the number of stations visible in the current frame out of the total, for example "26/26". On the right is the zoom level.
Gray line icon
At the bottom left of the map is an icon: a moon if night blackout is on, a sun if it's off. Tapping it switches from one to the other, and your choice is saved. With the blackout active, the map updates itself every five minutes, to follow the movement of the sunset.
Message list
Below the map is the list of the latest decoded messages, with the decoder colors. Each line has the mode on the left (FT8, FT4 or FT2), then the message and, on the right, the country with distance and direction (if the name is too long it scrolls by itself). When the mode changes, a separator line appears, "=== FT8 ===" and the like. Before the first message the list shows "Waiting for messages".
LIVE view and LOG view
In LIVE the map and list follow incoming messages. To examine a station, tap on the list of messages: you go to the LOG view, with the list frozen and the last message selected (the line is colored, with blue text). The selected station becomes a blue dot on the map, with a thicker red line from your QTH, and the box on the right shows its data.
In LOG, turn the knob to scroll backwards through the messages: the selection, the map and the data pane follow. Separator lines are skipped. You can also directly tap a dot on the map to select it. Tapping the data box centers the map on the selected station. If the message does not contain a locator (for example a 73) there is no dot, and in the box the locator and distance are "---".
To return to LIVE, tap the message list again. If, while remaining in LOG, many new messages arrive (around 240), the radio returns to LIVE on its own.